Let’s say you have an iOS app (like SimpliFit), you’re using Laravel (or any PHP framework) for your API, and you want to validate an iOS in-app purchase (IAP) with Apple’s servers. Where to begin? Well, you might think about checking Apple’s documentation on Validating Receipts With The App Store. But that won’t help, at least not much.
To say that Apple’s documentation around IAPs is lacking is an understatement. So I turned to Google and found numerous StackOverflow posts, Github repos and gists, and blog posts concerning validating IAPs, specifically with PHP. Unfortunately, many were several years old and no longer accurate, leaving me confused and with a puzzle with many missing pieces. But I’ve finally solved it. And to help everyone else going through this agony, here’s what I’ve learned.
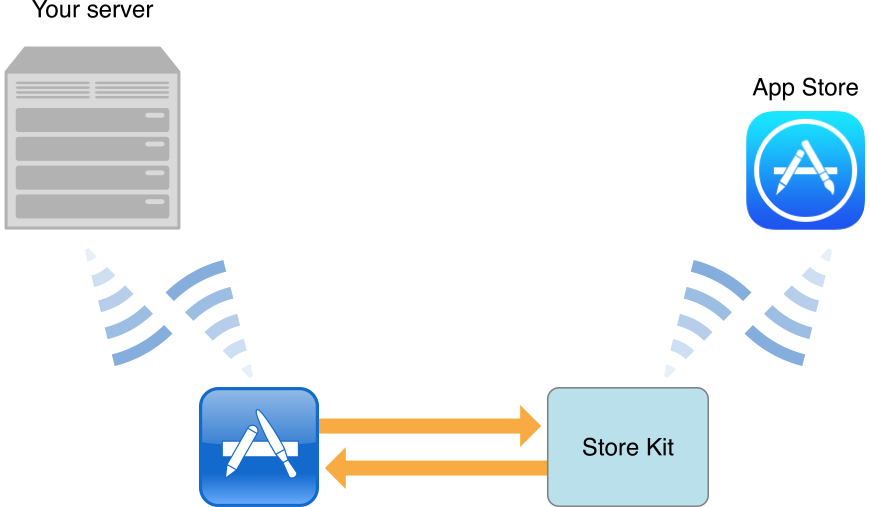
But first, a quick review of our setup. On the front-end, SimpliFit’s iOS app is built using AngularJS and Cordova, with purchases being handled via the Cordova Purchase Plugin. The Cordova Purchase Plugin takes care of communicating with Apple’s Store Kit framework (which in turn communicates with Apple’s App Store, see image below). And on the back-end, our API is built with Laravel on AWS.

Source: https://developer.apple.com/library/ios/documentation/NetworkingInternet/Conceptual/StoreKitGuide/Introduction.html
The IAP Process Breakdown
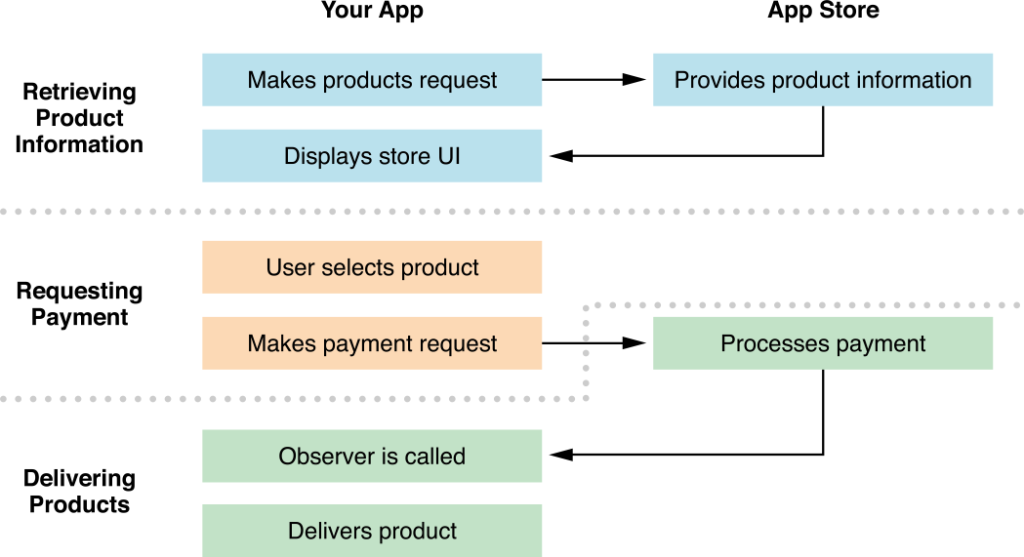
Let’s breakdown this process into 3 stages, as outlined in Apple’s documentation:
- First, the products that the user can purchase are retrieved and displayed.
- Once the user selects a product, a payment request is initiated.
- Upon successful payment, the product is delivered to the user

Source: https://developer.apple.com/library/ios/documentation/NetworkingInternet/Conceptual/StoreKitGuide/Introduction.html
One thing to note about this breakdown is that this does not account for any iOS app to back-end API (which I’ll simply refer to as Laravel going forward) communication. For that…
Digging Deeper
The IAP process begins when the iOS app must present the user with the in-app products that can be purchased. In the SimpliFit app, this occurs once the user’s free trial ends, or their subscription needs to be renewed, and the user must purchase a subscription to continue using the app.
There are two possible methods to retrieve the products to display to the user: 1) hard-code the products into the app or 2) get a list of products from a server. The second option is highly recommended as it allows you to modify products and pricing without having to update the iOS app. The first option may be appropriate if you only have products that unlock functionality locally within the app and don’t need to be updated often.
Either way, you will need to embed the Store Kit framework into your app, which allows your app to communicate with Apple’s App Store. As mentioned above, the Cordova Purchase Plugin thankfully takes care of this for you and provides a simple API to interact with Store Kit.
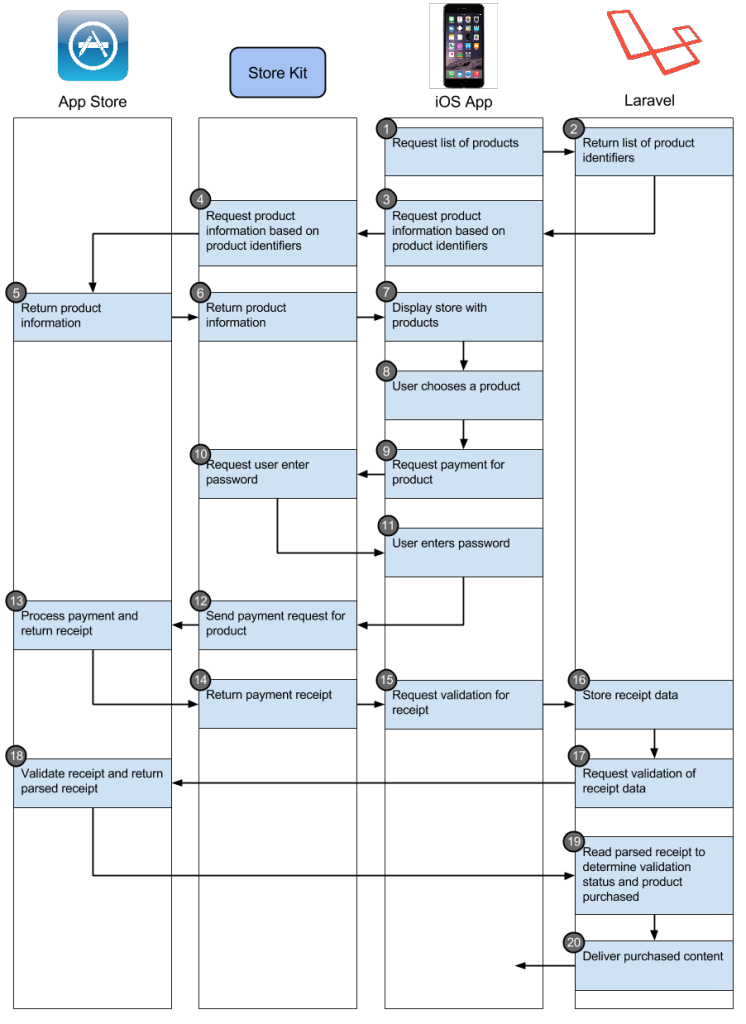
The steps outlined below assume the “happy path” and are numbered according to the diagram further below:
- The iOS app requests list of products from Laravel
- Laravel returns the list of product identifiers currently available for purchase
- The iOS app sends these product identifiers to Store Kit
- Store Kit requests product information based on product identifiers
- The App Store returns production information (title, price, etc.)
- Store Kit returns the production information from the App Store
- The iOS app displays the products to the user
- The user selects a product to purchase
- The iOS app requests payment for product
- Store Kit prepares for a purchase by requesting the user’s Apple account password
- The user enters his/her password
- Store Kit sends the purchase request and password to the App Store
- The App Store processes the purchase and returns a purchase receipt
- Store Kit sends the receipt to the iOS app
- The iOS app sends the receipt data to Laravel for validation
- Laravel records the receipt data to create an audit trail
- Laravel sends the receipt data to the App Store to validate the purchase
- The App Store validates the receipt and returns a parsed receipt
- Laravel reads the App Store response and marks the purchase as valid
- Laravel unlocks the purchased content and notifies the iOS app

Notes on this process:
- As mentioned above, steps 1 and 2 can be accomplished via hardcoding the product identifiers into the iOS app.
- Steps 17-20 aren’t necessarily required but are highly recommended. This will prevent someone from sending a fake receipt to fool your app into delivering unpaid content.
Retrieving Product Information
Let’s start with the first stage. From the perspective of Laravel, this is simple, and since I don’t work with Cordova directly, I’ll be glossing over anything that doesn’t pertain to Laravel.
For the SimpliFit app, Laravel tracks a user’s subscription status. That starts with a one month free trial upon registration. I have a Subscription model that tracks the status of the subscription (trial, trial_ended, active, grace, lapsed, cancelled, or lifetime), when the status ends (e.g., when the trial ends), and an associated transaction_id (for active subscriptions, tied to the Transaction model).
On certain API calls from the iOS app, the subscription is checked against the current date. If it’s determined that a status has expired, a new inactive subscription entry is created. At this point, a specific error code is returned to the app, specifying if a trial just ended, a subscription lapsed, or the subscription was cancelled. The app displays a blocking modal populated with text sent in the error. The user can no longer use the app until he/she subscribes.
This is where we get into the IAP flow. Once the user acknowledges the message in the modal, the app requests the available products for purchase from Laravel. Here I have a Product model that holds product_uid, platform, price, billing_interval, trial_length, description, and active (denotes whether the product is currently active and is available to purchase). The platform enumeration exists as we plan to build in IAPs into our Android app, so we need a way of distinguishing which platform a specific product belongs to. The product_uid field is the identifier of the product as specified in iTunes Connect (where you as the developer create the products for purchase in the app). The description is used internally only to help distinguish products.
So Laravel grabs the active products for the given platform (which we specify using a Client-Platform header in all requests) and returns the product_uid of each product to the app. Here’s what that would look like:
As outlined in the flowchart, the app passes these product identifiers to Store Kit, which then retrieves the products and their associated information from the App Store (i.e., the products you created in iTunes Connect). Store Kit passes these products back to the app, which then displays the products to the user.
Requesting Payment
Now that the user has been presented with the products that can be purchased through the app, this stage only involved the app, Store Kit, and the App Store.
You can refer to the Cordova Purchase Plugin for details on how your Cordova app can communicate with the App Store through Store Kit, but as I outlined in the flowchart above, there’s isn’t much to it:
- The app requests payment for a product,
- Store Kit requires the user’s password to confirm the purchase, and
- The payment request is sent to the App Store.
The next stage is where things start to get complicated.
Delivering Products
Assuming the user’s payment is processed successfully, the App Store will return a receipt to the app. The Cordova Purchase Plugin then provides the app with a JSON receipt that will look like this:
NOTE: This receipt structure is specific to the Cordova Purchase Plugin. If your app uses a different method to communicate with Store Kit, the receipt structure may differ.
Let’s break this down by parameter:
- The “type” parameter specifies the type of purchase.
- The “id” parameter is the transaction id for the purchase.
- The “appStoreReceipt” parameter is a base64 encoded iOS 7-style receipt.
- The “transactionReceipt” parameter is a base64 encoded iOS 6-style receipt. This receipt is technically deprecated by Apple, but it’s use is still allowed. I would avoid using this receipt, as Apple could decide to drop support for this receipt type at any point.
Side Project: Base64 Decode Receipt
Just for fun, try decoding the “appStoreReceipt” and “transactionReceipt” data you receive from you app. Use PHP’s base64_decode($string) function.
You’ll find another object in that encoded data, which contains “signature”, “purchase-info”, “environment”, “pod”, and “signing-status” parameters.
And if you base64 decode the “purchase-info” data, you’ll find the exact same data that you’ll receive back from the App Store when you try to verify a transaction.
So technically you have all the transaction data you need in the receipt from the app, you just don’t know if it’s valid or not.
So now that we have the receipt from the app, we need to validate the transaction with the App Store. As I mentioned at the beginning, Apple’s documentation is severely lacking with what exactly you need to send for validation.
Let’s take this step-by-step, but before we do, note that I use Laracast’s command pattern. The code below is from my StoreTransactionCommandHandler class, and I may be omitting code that isn’t necessary to the discussion or that I can’t share.
Store the receipt data
First I store the base64 encoded “appStoreReceipt” data. This is done not only to store the receipt data in case the receipt is deemed invalid by Apple, but also to allow re-validation of the receipt if it ever becomes necessary.
I use my TransactionRepositoryInterface $transactionRepo to store this receipt data and tie it to a user and platform:
Set the endpoint
Apple provides two URLs for validating receipts with the App Store:
- Sandbox: https://sandbox.itunes.apple.com/verifyReceipt
- Production: https://buy.itunes.apple.com/verifyReceipt
In Laravel, I have a function that checks the version of the front-end app. If the app is a development version (i.e., one that hasn’t been released to the public but is either being tested in a dev environment or is being used by an Apple reviewer), the endpoint the Laravel communicates with is the sandbox server. If the version is a production version then I direct validations to Apple’s production server.
Build the JSON receipt object
Apple’s documentation is thankfully clear regarding what is required in the receipt JSON. This function takes the full receipt received from the app and uses the “appStoreReceipt” data for the receipt object.
Apple’s documentation mentions a “password” parameter, which is only use for auto-renewing subscriptions. If you’re validating a receipt for an auto-reneweing receipt, go to iTunes Connect and get the hexadecimal shared secret for your app. This is the password you will send to the App Store.
Make the request
Now that we have the receipt object built and the endpoint set, we’re ready to communicate with the App Store. There are two ways you could do this: cURL or stream context. I had issues with getting a cURL implementation working, and I found the stream context method easier to work with. Here’s my code:
What we’re doing here is first setting the HTTP options for the stream context (more info on stream context HTTP options here): specify a POST request, set the content type for the request, and set the $receiptObject as the content. After that, we create the stream context resource.
With the file_get_contents function (documentation), we’re telling PHP to convert the contents of a file (in this case, Apple’s server URL) to a string using the given stream context.
As you can see, I have an error flow for if the result comes back as FALSE. If you read the documentation for file_get_contents, you’ll see that the returned values are the read data or FALSE on failure. So if the call to the App Store fails, I’ve added an error flow to notify the front-end app.
If all goes well, though, I decode the JSON data as an associative array. Here’s what that might look like:
NOTE: The validated receipt may contain multiple transactions in the “in_app” parameter. It seems that Apple keeps all of the user’s transactions in the receipt in chronological order. Assuming users can only purchase one product at a time in your app, you want to grab the last transaction in the “in_app” array.
The important parameters in this receipt are:
- status – the outcome of Apple’s validation (see status codes below)
- receipt.in_app.0.product_id – the product_uid purchased
- receipt.in_app.0.transaction_id – the transaction identifier
These are the only parameters I use in my code, but feel free to look through the meanings of the other parameters in Apple’s documentation.
The status code is the most important parameter, though. This tells you the outcome of Apple’s validation. Here are the possible status codes and what they mean:
| Status | Description |
| 0 | The receipt provided is valid. |
| 21000 | The App Store could not read the JSON object you provided. |
| 21002 | The data in the receipt-data property was malformed. |
| 21003 | The receipt could not be authenticated. |
| 21004 | The shared secret you provided does not match the shared secret on file for your account.Only returned for iOS 6 style transaction receipts for auto-renewable subscriptions. |
| 21005 | The receipt server is not currently available. |
| 21006 | This receipt is valid but the subscription has expired. When this status code is returned to your server, the receipt data is also decoded and returned as part of the response.Only returned for iOS 6 style transaction receipts for auto-renewable subscriptions. |
| 21007 | This receipt is a sandbox receipt, but it was sent to the production server. |
| 21008 | This receipt is a production receipt, but it was sent to the sandbox server. |
Validate the response
So now the we have a response back from the App Store, it’s time to validate it’s what we were expecting. I do two things here: 1) check if the status code is set and 2) check if the status code is non-zero.
Add the validated receipt and start subscription
For the SimpliFit app, we now know the receipt is valid and the user purchased a subscription. I store the transaction identifier from the receipt and mark the transaction as verified.
Depending on the product_uid in the receipt, I then add a subscription entry for the user. The user can now use the app for the specified period of time of the subscription!
Now I just respond OK to the front-end app, indicating the user is now a subscriber, and the app can direct the user back into the main flow of the app.
Closing Notes
For the SimpliFit iOS app, we are using non-renewing subscriptions, as we are not eligible for auto-renewing subscriptions according to Apple’s policies (only NewsStand and media apps can have auto-renewing subscriptions to the best of our understanding). In iTunes Connect, when you create a non-renewing subscription, you don’t specify a time length for the subscription. As soon as your iOS app transitions a purchase to “owned”, the subscription is available to purchase again by the user. It is up to you app and/or server to track the subscription duration.
Next Steps
So what’s next for SimpliFit? Android payments. From first glance, the overall flow is similar, with one crucial difference: Google’s payment verification API requires your server to be authenticated before making the payment API call. I’m still trying to determine the best method to deal with this, so keep an eye out for an Android-themed version of this post in the near future.
Resources:
- GitHub – Cordova Purchase Plugin
- StackOverflow – iOS7 receipts not validating at sandbox
- iOS Developer Library – About In-App Purchase
- iOS Developer Library – Validating Receipts With the App Store
- iOS Developer Library – Receipt Fields
- PHP Manual – stream_context_create
- PHP Manual – file_get_contents


Thank you you save my time. In case of auto-renewal please mention the webhook concept.
3.1.2 Subscriptions: Apps may offer auto-renewing in-app purchase subscriptions, regardless of category on the App Store. When incorporating auto-renewable subscriptions into your app, be sure to follow the guidelines below.
3.1.2(a) Permissible uses: If you offer an auto-renewing subscription, you must provide ongoing value to the customer, and the subscription period must last at least seven days and be available across all of the user’s devices.
Great article, you had just save me some at least 1 day work time to learn this process. Besides this, do you considered to implements the refund notification web hook? They just announce it June 24, 2020 https://developer.apple.com/news/?id=tv3bhra6
As stated in the documents the ‘in_app’ array is not in chronological order.
“The in_app array is not in chronological order. When parsing the array, iterate over all items to ensure all items are fulfilled. For example, you cannot assume that the last item in the array is the most recent.”
https://developer.apple.com/documentation/appstorereceipts/responsebody/receipt/in_app
`ѩ`ԩ`?֥ɷԩ`LTļͨ,luxurybrandsale2019֥ɥԩ`, `ѩ`ԩ`ڥߥեå⼤ ֥ɥͥԩ`֥ɥǥ`ԩ`֥ DGԩ`֥ɥԩ` ֥ɥåԩ`.`ѩ` ԩ` `ѩ` ԩ` ͨΥͥåͨ̽륵ȤǤ
֥ `ѩ` ԩ`
So is it true you only need the [0] in the in-app array!?
Big thanks for the great guide :-)!
One question though: Did you experience any expiration of the base 64 receipt data? Since my app depends highly on push notifications it is likely that it’s not opened for a long time and so the receipt data may be old than.
Thanks in advance!
Why you didn’t include the expiration date as an important field in a subscription receipt?
Thank you so much. It’s very very useful 🙂
Thank you for your detailed explanation.
Thanks for the best description I have found about iOS In App Purchase.
One question I still don’t understand: What do you return to the App?
According to the documentation in Cordova Purchase Plugin, store.validator should look like this:
callback(true, { … transaction details … }); // success!
// OR
callback(false, {
error: {
code: store.PURCHASE_EXPIRED,
message: “XYZ”
}
});
// OR
callback(false, “Impossible to proceed with validation”);
// Here, you will typically want to contact your own webservice
// where you check transaction receipts with either Apple or
// Google servers.
I have an app with autorenew on subscriptions, but I just can’t figure the return result out.
Great article! thanks for clarifying the process with iOS. I got confused with some old and outdated docs around the web.
Just one thing: I would use the GuzzleHttp package instead of cURL, it makes the code cleaner and easier to read.
What about that Android follow-up you promised? 🙂
Thanks for the tip! Android follow-up coming today.