Hot on the heels of my Laravel on AWS Elastic Beanstalk Dev Guide (i.e., 2.5 years later), I’m happy to publish my Laravel 5 on AWS Elastic Beanstalk Production Guide! So let’s dive right into it.
Background
There have been a lot of changes with Laravel and with Elastic Beanstalk since my Dev Guide in 2014. This guide steps you through the process of deploying a Laravel 5 app to AWS Elastic Beanstalk.
I presented this deployment flow during the February LaravelSF Meetup event at the AWS Loft in San Francisco. During my presentation I used my demo app, LaraSqrrl, to show the process, along with integration with S3 and SQS (upcoming posts).
Prerequisites
As in my previous guide, there are some prerequisites before you jump into the guide:
- You should have an AWS account.
- You have git installed and a git repo initiated for your project.
- You should familiarize yourself with Elastic Beanstalk.
RDS Database
I like to keep my RDS instance separated from Elastic Beanstalk, as RDS instances created by and associated with an Elastic Beanstalk environment will be terminated when the environment is terminated. Separating the RDS instance from the environment allows you to keep the same database regardless of the environment.
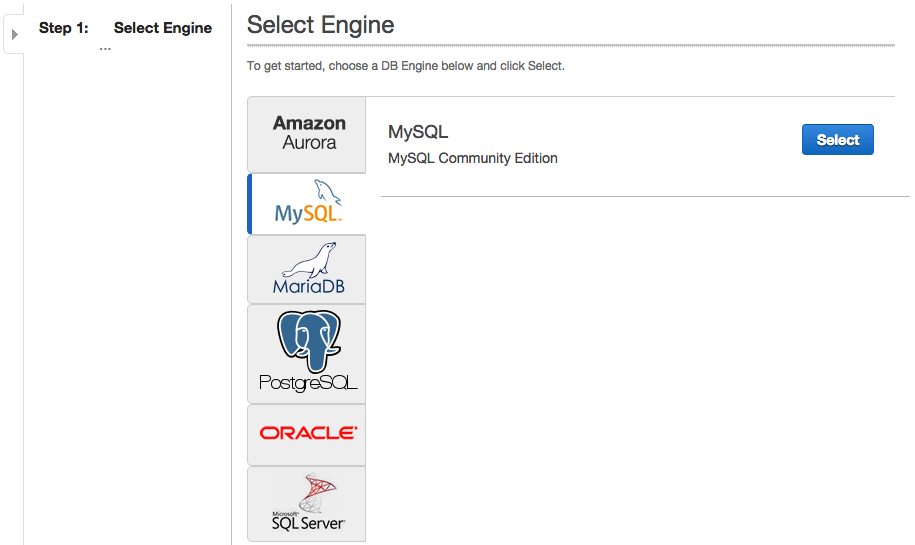
Step 1: Choose your engine
Choose whichever database engine your app is set up for. I generally use MySQL with Laravel, so that’s what I’ll select.
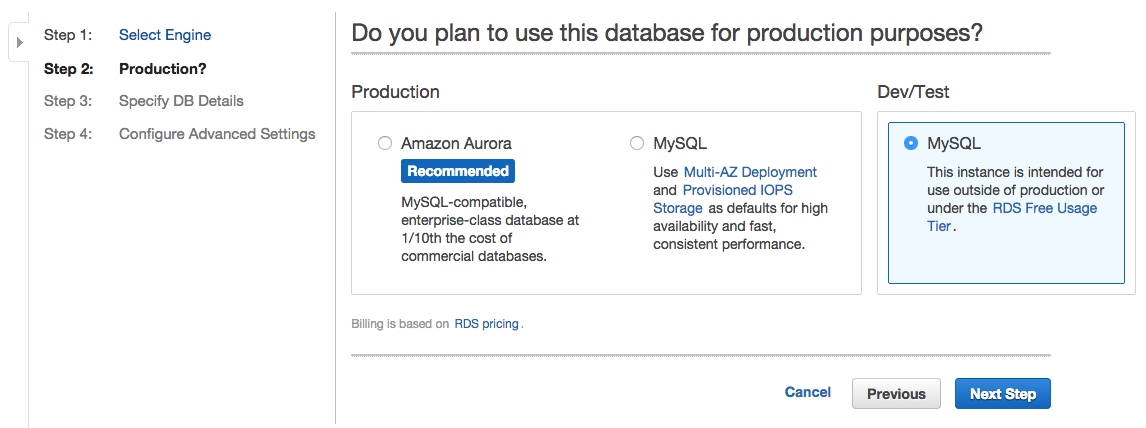
Step 2. Production vs. Development
For production apps, Multi-AZ deployment is recommended. The advantage here is that if one server goes down for any reason, you’ll have a backup ready to go. And if you choose to change any options on your database (e.g., increase allocated storage), the servers will be updated one at a time, meaning your database never suffers any down-time and seamlessly switches to the updated server.
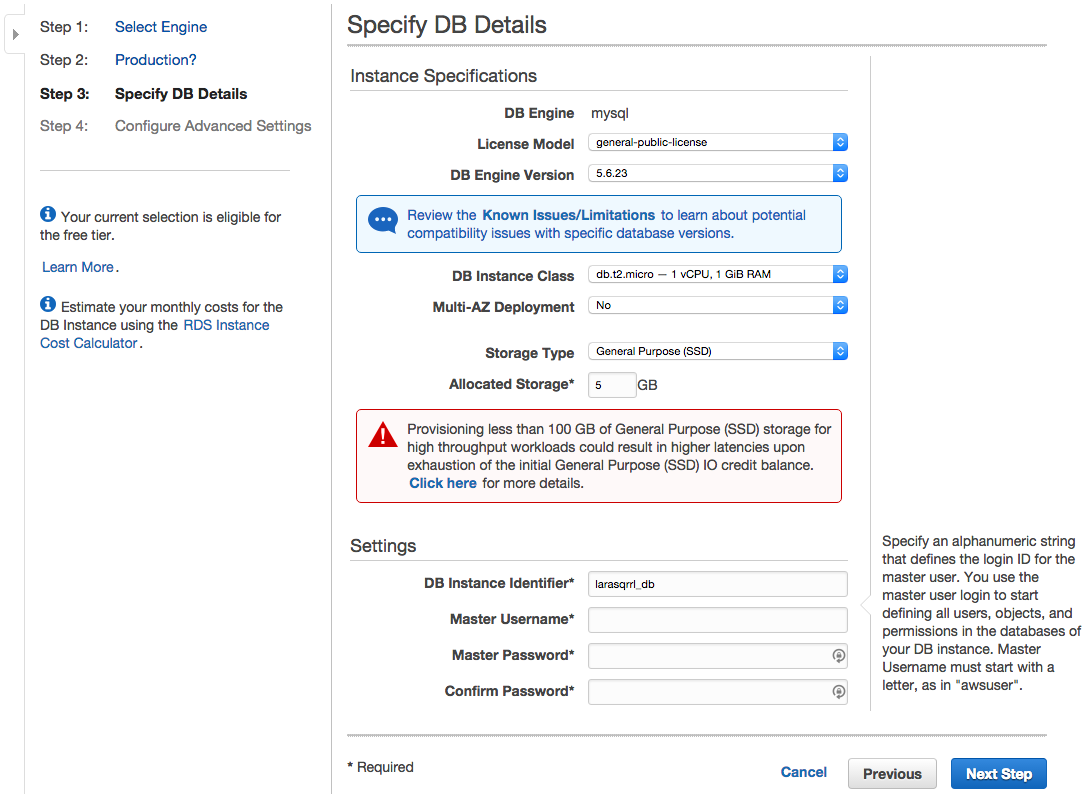
Step 3. Specify Database Details
Now you’re ready to set up the details of your database. The important bits here are:
- DB Instance Class – The size of the RDS instance. Choosing the right size is a difficult task, but db.t2.small is probably the smallest you should use for any production app. You can always upgrade the size as your app grows.
- Multi-AZ Deployment – Enable or disable deploying to multiple Availability Zones (keep in mind this means you’ll be paying for 2 instances of the size specified).
Step 4: Network, Security, Database Name, Backup, Monitoring, and Maintenance
This is a pretty big sections, but we’ll start with Network and Security options. I’d suggest leaving everything as the default, but we want to specify our VPC Security Group. There are 2 ways that I’ve set this up in the past (though I’m certain you can do it many other ways as well, so leave your experiences in the comments!):
- Use the default security group. I’ve done this when I plan to have one RDS instance host databases for several Elastic Beanstalk apps. I treat the default security group as the “database security group” and allow inbound connections for only my IP and the Elastic Beanstalk apps using the DB.
- Use the AWSEBSecuritygroup security group. I’ve done this when I will have only one Elastic Beanstalk instance access the RDS instance. Be sure to select the AWSEBSecuritygroup group (like in the screenshot below) and not the AWSEBLoadBalancer security group, as it’s the EC2 instances in theAWSEBSecuritygroup group accessing RDS and not the load balancer!

After that you have some additional database options. There is only really one field of note here, and that’s Database Name. This is the name of the database schema that will be created within the MySQL database. You can also change the port, though I tend to leave it at the default.
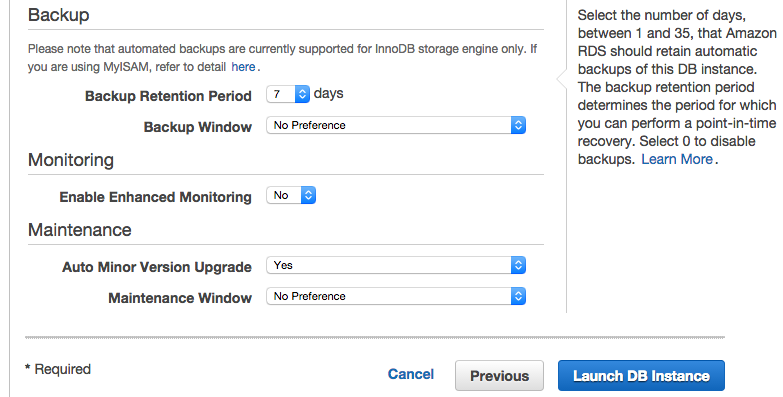
And finally we have Backup, Monitoring, and Maintenance. For Backup retention period, adjust this based on the data you’ll be storing. Generally only a few days is enough, and 7 days feels like overkill. If you don’t want any backup retention, just change this value to 0. When you do that, you’ll get this lovely warning:

Then adjust your Backup Window based on when you think your app will be used the least during the day.
Enhanced monitoring can give you insight into a lot of specific of your RDS instance, but you’ll have to pay for data transfer charges to CloudWatch Logs. Check out this AWS blog post about enhanced monitoring for more details.
Last but not least, is server maintenance. I would recommend leaving Auto Minor Version Upgrade as yes (to get bug fix updates), and change the Maintenance Window to a period of the day where your app will be used the least.
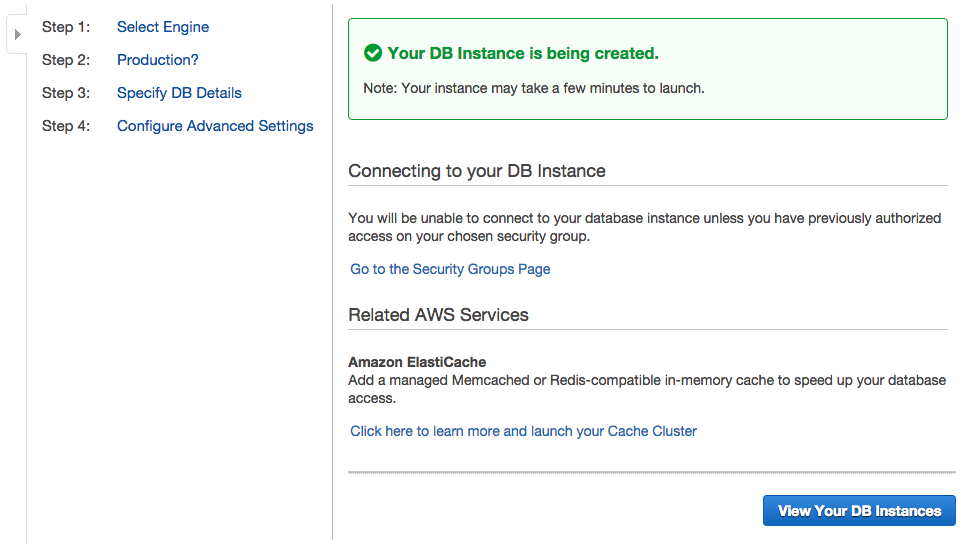
We’re ready to go now, so go ahead and click “Launch DB Instance”! It’ll take a bit for the instance to launch, but you can move on to the next section.
Security Credentials and Key Pair
If you followed my Elastic Beanstalk Dev Guide, then you should already have your AWS access key and a Key Pair so you can SSH into your EC2 instances. If not, visit that post and read those 2 sections (cmd+f or ctrl+f and search for “Generate Security Credentials”, since I don’t have in-page linking set up). Alternatively, skip the section on creating a Key Pair and create it during the Elastic Beanstalk setup process.
Keep these access keys in an easy-to-access location as you’ll need them in just a bit.
Install the new EB CLI
The easiest way to install the new EB CLI is via homebrew:
brew install awsebcli
And that’s it. If you don’t have homebrew or want to see the other ways to install the EB CLI, check out AWS’s EB CLI installation guide.
Initialize Your Elastic Beanstalk App
Open your command prompt/terminal and follow along to initialize Elastic Beanstalk for your app. Navigate to the root directory of your Laravel app and run the following command:
eb init
You’ll be prompted to set up a number of parameters for your app and account. First up, default service region:

Set this up in the region from which you think your app will be accessed the most. I usually default to US East.
Next you’ll have to enter your AWS credentials. These are the keys you either generated a few sections above or already had set up.

Now you’ll name your Elastic Beanstalk Application. Think of the application as the high-level collection for all the components (i.e., individual deployments, versions, and configs) for your app.

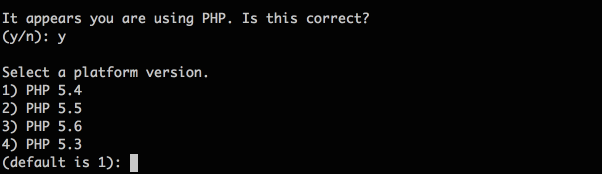
After your application name, the EB CLI will auto-detect the language you’re using, in this case PHP, and set the version of that language to use. The latest PHP version at the moment is 5.6. If you required PHP 7, you’ll need to configure your app to use a custom EC2 AMI (Amazon Machine Image). This is out of the scope of this post, but you can check out the Elastic Beanstalk documentation for Creating a Custom Amazon Machine Image (AMI).
Last up we have setting up SSH. This is an optional step, but I strong recommend you set this up so you can access your EC2 instances via SSH. This is where you’ll specify your Key Pair name if you’ve already generated one or generate a new one. If you generate a new Key Pair, you’ll need to optionally specify a passphrase which you’ll enter every time you use your Key Pair to SSH into an EC2 instance.

And that’s it! Your Elastic Beanstalk app is now set up. Head over to the Elastic Beanstalk Management Console and you’ll see your app with no environments yet.

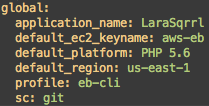
If you check out your project directory, you’ll see a new .elasticbeanstalk directory. This directory has also been added to your .gitignore file. In the directory you’ll find a config.yml file that specifies all the settings we just chose:
Create the Elastic Beanstalk Environment
Now we’re ready to set up our EB environment. If you followed my Elastic Beanstalk Dev Guide, then you remember being prompted to set the various EB config options before you launched anything, but the new EB CLI changes this process a bit. When you launch an EB environment, it uses some default configuration options, but you no longer have the ability to set those options through the CLI via prompts (e.g., single instance vs. load balanced environment) before you launch. You can create an environment and pass some options with the eb create command, but some important settings are missing (e.g., composer install option and document root).
You have 2 routes to deal with this:
- If you’ve already created an EB environment and want to use the same environment configuration options, you can save that environment’s configuration and use it to create a new environment. If this is you, then start at Step 2
- If you’ve never created an EB environment, then you’ll need to create an environment first, download the saved configuration, modify the configuration options, save the configuration, then use it to create a new environment. For this, start at Step 1 below.
Step 1: Create the default environment
If you want to create an auto-scaling environment, run:
eb create environment-name -i t2.micro --scale 2
If you want to create a single-instance environment, run:
eb create environment-name -i t2.micro --single
You’ll want to input your own values for the various options, but here are what they mean:
-i value– instance type, check out the list of EC2 Instance Types to choose one that fits your needs.--scale value– auto-scaling group starting size--single– specify a single-instance environment
If you just type eb create without any options, you’ll be prompted to specify some information (such as environment name). Here’s what that looks like:

This process can take some time. Whether you pass in options to the eb create statement or not, once the environment is created you’ll see:
![]()
The eb create method has several other parameters you can specify, so I encourage you check those out on the eb create reference page.
Step 2: Save the environment configuration locally, modify, and upload to S3
Next up we want to modify our environment to our needs for a Laravel app. First up, run eb config save --cfg configName where configName is the name of your choice for this config file.
![]()
This downloads the config file being used for the current environment to your local environment. Open this file in your favorite editor. Here’s what my config file looks like for an auto-scaling group of 1 instance:
The most important part of the config file is the aws:elasticbeanstalk:container:php:phpini: parameters, which specify the server to server from the /public folder and to run composer with the --no-dev option.
I would recommend that you do not copy my config file and overwrite yours, as some of the IDs and group names will be different. Only choose the pieces that you need.
To read more about these yaml config files, check out AWS’s documentation on the Environment Manifest
Alright, we have our config file modified, now we need to upload it to S3 so we can use the config to launch new environments. Run eb config put configName where configName is what you used in the first download step.
These config files can be confusing, and I’d recommend you read AWS’s documentation to learn a bit more:
- AWS Environment Manifest
- Setting Configuration Options Before Environment Creation
- Setting Configuration Options During Environment Creation
- Setting Configuration Options After Environment Creation
Step 3: Create a new environment using the saved configuration
Now that you have a config file for Elastic Beanstalk set up for Laravel, you can either:
- Terminate your current environment and create a new environment using the configuration file. To do this, run:
eb terminate environment_nameeb create environment_name --cfg configName
- Modify the existing running environment by running
eb config --cfg configName
I’ve had mixed results with modifying the running environment, so I usually just start with a clean slate. I encourage you to try both methods and see which works best for you.
Elastic Beanstalk Config Files
Although we have the Elastic Beanstalk environment set up, we still need to create some configuration files that Elastic Beanstalk will run at deploy time. This includes setting up composer, cron, and environment variables.
When you first run eb init for your repo, the eb CLI creates a .ebextensions folder in the root directory of your repo. This is where you put configuration files to run at deploy time. For more information about these files, check out the Advanced Customization With Configuration Files (.ebextensions) documentation.
Notes:
- The config files generally run in order of name, which is why I number my files to ensure specific order. There are some caveats, where certain types of commands are run first regardless, and that information can be found in the above documentation.
- Be sure to commit these config files to your repo, otherwise they won’t be part of the deploy to Elastic Beanstalk!
01setup.config
The setup.config is pretty simple:
We set COMPOSER_HOME, update Composer, and optimize Composer. I’ve also included the document_root and composer_options parameters in here as well in case you’d prefer to set these options here instead of the environmen.cfg.yaml file.
02env_vars.config
Committing your .env file to your repo is bad practice, and can be dangerous for public repos. Committing your environment variables to Elastic Beanstalk .config files is also bad practice. So where does that leave you? Well, my preferred method is to keep a production .env file in a private S3 bucket, and pull it in while deploying.
Here’s my config script for that:
What this script does is apply an S3 role on the instance to access the app-env bucket where I have my production .env file. Next is fetches the file from S3 and moves it to a temporary folder. Lastly, it moves the file to the the /var/app/ondeck directory, which is where the currently deploying app is set up before being moved to current folder.
Before this script can do it’s magic, though, we need to set up S3!
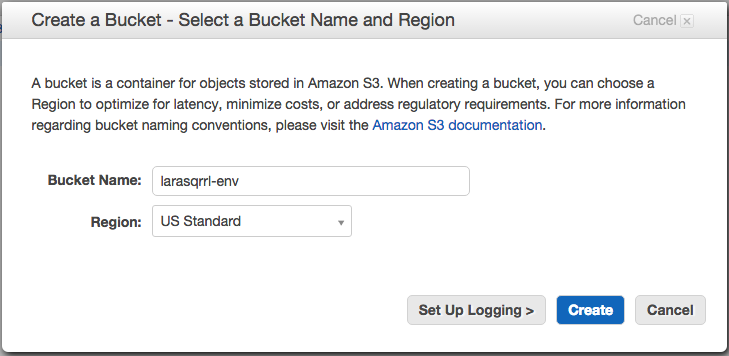
Go to S3 and create a new bucket. In my case, I’m naming it for my app, larasqrrl-env.
Next, click on the newly created bucket, go to its properties, and go to permissions.
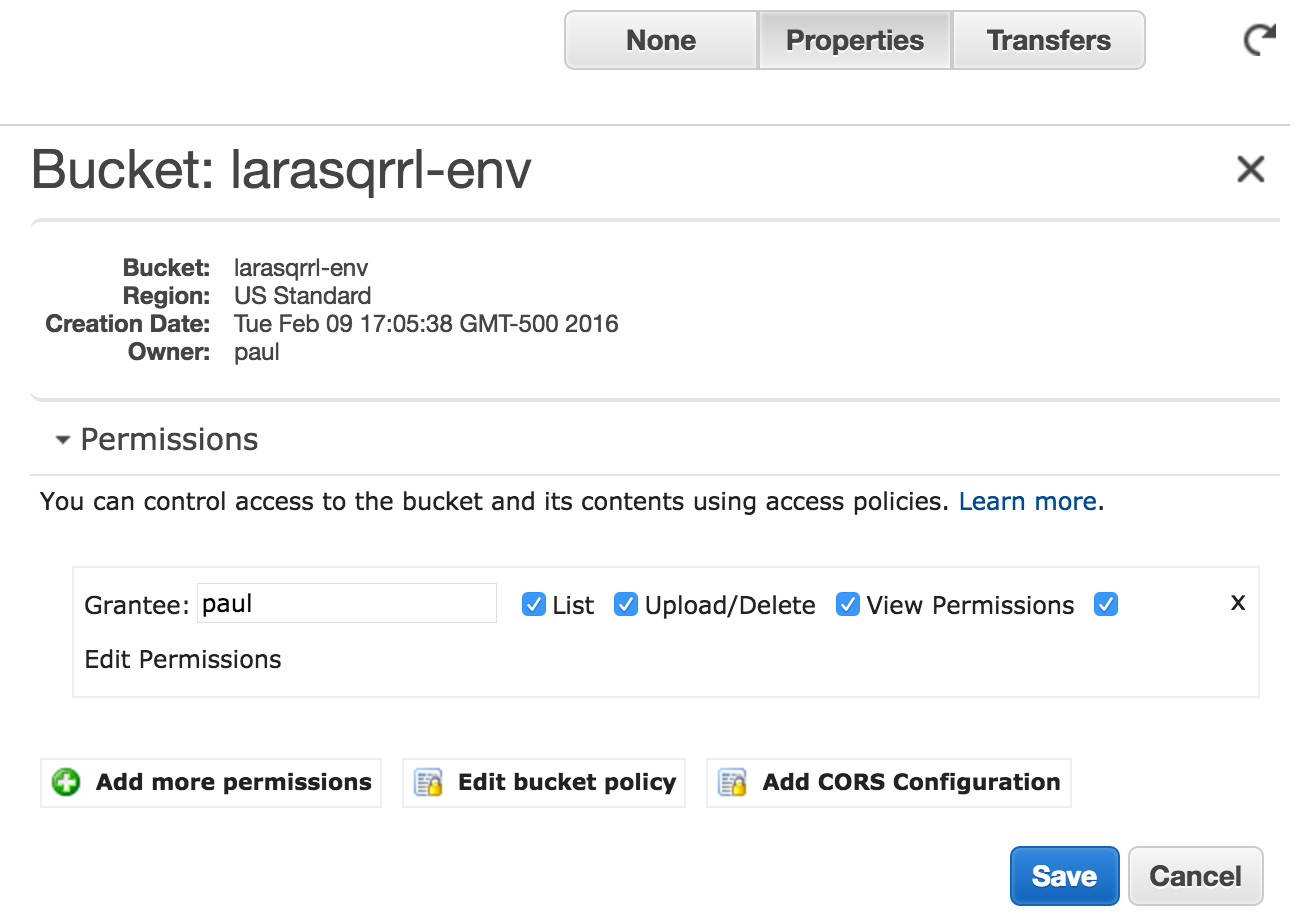
Add or edit the bucket policy to the following:
The “AWS” parameter is the role ARN that will have access to this bucket. You can get your elastic beanstalk role ARN by going to the IAM console and clicking on roles.
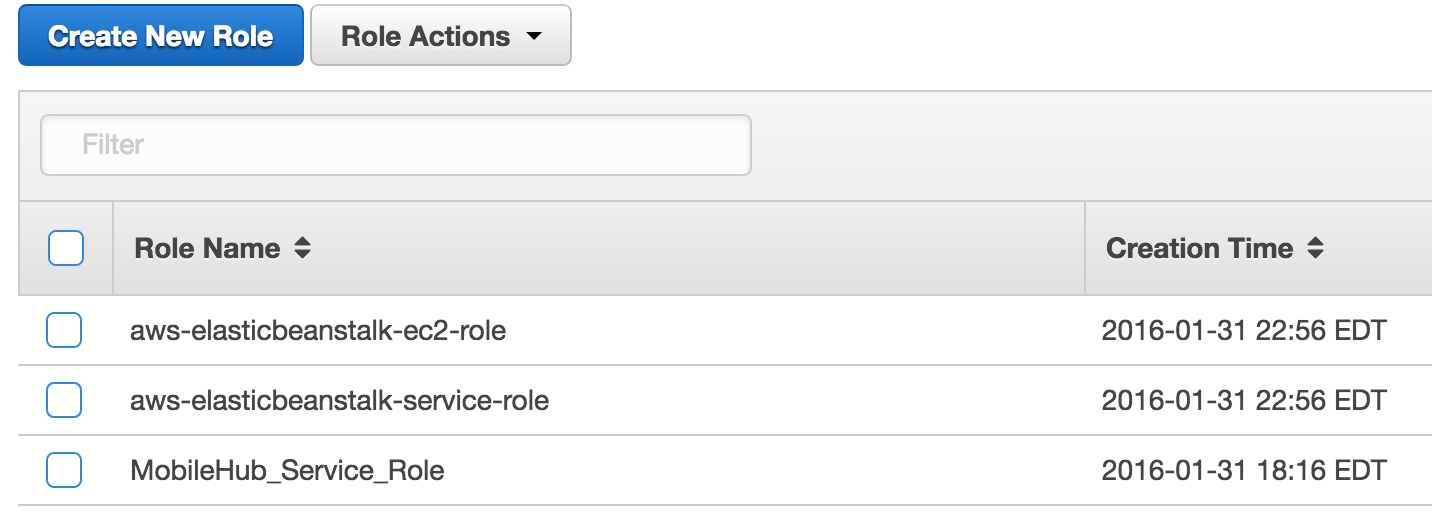
Select the aws-elasticbeanstalk-ec2-role (or the custom EC2 role you created if you chose to do so), and copy the Role ARN. Use this ARM in your bucket policy above.
With all that set up, go ahead and upload your .env file to your S3 bucket.
03artisan.config
When deploying your Laravel app for the first time, you will likely need to run a migration and maybe seed the database. This file contains those Artisan commands.
After the first deploy, comment out the db:seed command and the migrate command if it isn’t needed. You’ll notice these two commands have the leader_only: true parameter, indicating that these commands should not run on each EC2 instance if you have more than 1 instance in your auto-scaling group.
The remaining commands clear the cache, optimize Artisan, and finally set the proper permissions on the Laravel folder.
04supervisor.config
This file will setup supervisor to monitor your queue workers. If you will have separate queue worker instances, then this file isn’t necessary for this environment.
Note: After the first deploy, remove this file fully, as re-running these commands will cause errors on deploy. I’m looking into ways to optionally do this when running updates to ensure when your app auto-scales, supervisor starts up on the new EC2 instances. If you have suggestions, please leave a comment!
05crong.config
This file set up the Artisan Scheduler cron job for your app. If your app won’t be using Scheduler, omit this file from your config files.
Deploy your Laravel app
Alright, we have our Elastic Beanstalk environment configured and our deploy config files set! We’re finally ready to deploy. Luckily, this part is easy. Just run:
eb deploy environment_name
That’s it! You’re up and running on Elastic Beanstalk! Navigate to the URL for your environment (e.g., environmentname-hdb582lbjd.elasticbeanstalk.com) to see your Laravel application live.
Deleting your Environment
As with the dev guide, since we’ve added this environment’s Security Group ID to the inbound rules of the default Security Group, we need to first remove that rule in the EC2 Management Console.
After that rule is removed, deleting the environment is a simple command line/terminal command:
eb terminate environment_name
Did I miss something? Have questions about the process? Leave a comment!
Great guide! I appreciate you sharing this content, how to remove old cron jobs
thank you
不赖!真的不赖!
Great guide! I appreciate you sharing this content.
It would be a better practice to move the cron job and queue worker from supervisord to Beanstalk Worker Tier.
Great article. How did you discover the “var/app/ondeck” quirk? I have searched the entire 1100 page elastic-beanstalk doc pdf and the rest of the aws site with nothing.
I updated my config files from var/app/ondeck to var/app/ because I was familiar with the directory structure and had assumed that you added that in. Forgive me for perusing! The odd thing is I sshd into my environment and it still updated my var/app with a .env file and ran the artisan commands.
However, after deploying again, my .env file was no longer present and the artisan commands were giving me trouble. I checked the log files and lo and behold I saw the ondeck stuff. I gotta say I’m loving azure and their amazingly terse docs and tutorials. Aws is so verbose yet the only place I can find ondeck info is in a log file? What gives? Any tips on how to get the most out of AWS’s docs?
Hi Austin, I can’t take credit for finding that directory. I spent a lot of time on the phone and in chat with AWS support to get help with a number of issues I encountered. AWS definitely has a documentation issue, where a lot of quirks aren’t well document or aren’t documented at all. This is where having access to AWS experts either via AWS support or at an AWS Loft, like the one in San Francisco, is a huge help. I only wish they had more Lofts throughout the country. One nice trick is that you can enable AWS support when you need help and then deactivate it, so that you don’t have to pay for a full month of support!
Cloud hosting like AWS , DO , Linode are very secure and easy scalable but managing php application cloud server is very difficult task for new developer user let’s try Cloudways Manage hosting its provides easy deployment of php/Laravel application just on few clicks with others security features .
What do you do for `npm run production` or `npm install` asset compiling/mixing?
I have been spending days trying things, hundreds of attempts later, no luck. I can’t get node/npm to install or run my asset compiling for my Laravel 5.6 app….
Hi Logan, you can add additional .config files to the .ebextensions directory to run additional commands. I use the .config files to run various commands, such as installing and starting up ClamAV or setting up additional SSH users and keys.
Instead of EBS, why not use Cloudways Laravel hosting. With this platform, you don’t even need to connect your AWS instance, unlike EBS. Just launch the Laravel server on AWS from their platform in one-click. In few minutes, your server will be automatically ready.
Hi Oliver, I haven’t heard of Cloudways, but that looks like a great option! In the past, I’ve found services built on top of AWS (e.g., Heroku) can be difficult to configure when you need custom setups. Also, most of those services charge higher pricing than AWS itself. It can definitely be a timesaver for simpler deployments, though!
For the supervisor config, I think you need to modify the shell script you create to conditionally install and/or start the process. Like so:
“/opt/elasticbeanstalk/hooks/appdeploy/post/99_supervisor”:
mode: “000777”
owner: root
group: root
content: |
#!/usr/bin/env bash
if [ ! -f /usr/local/bin/supervisord ]; then
echo “Install and start supervisor”
sudo easy_install supervisor==3.3.3
supervisord -c /tmp/new_supervisord_conf
else
echo “supervisor already installed”
if ps aux | grep -q “[/]usr/local/bin/supervisord”; then
echo “supervisor is running”
else
echo “Starting supervisor”
sudo /usr/local/bin/supervisord -c /tmp/new_supervisord_conf
fi
fi
That’s a great point! Do you mind if I update my supervisor file with your code?
Thanks for all the info. I am currently working on an online tool. It would be a business tool for startups and is an SAS portal. My question is, is elastic beanstalk good for heavy load production setup or should i go for my own ec2 setup. I expect that my tool would be used by multiple businesses parallely and hence i want to take as much precaution beforehand.
At my current company, Infuse, we use Elastic Beanstalk for production workloads for large enterprise and consumer apps without any issues. If you set up the EB environment with a load balancer and have auto-scaling triggers set, then your environment can handle any amount of users.
Hi,
I’ve follwed your instructions, everything is working but RDS perfomance is very very poor, and I cant figure out why.
On a 5$ droplet from digital ocean, mysqlslap benchmark shows:
Average number of seconds to run all queries: 0.791 seconds
The same benchmark on RDS:
Average number of seconds to run all queries: 3.358 seconds
I tried everything… Provisioned SSD, tunning mysql params (http://www.speedemy.com/17-key-mysql-config-file-settings-mysql-5-7-proof/), mysql version.. nothing seems to work. Have you ever experienced this ?
Hi Lucas, I haven’t noticed any performance issues with RDS. What instance size are you using in RDS?
Hey, thanks for a great article!
You’re welcome! Glad it was helpful!
This shit article doesn’t match with the EB. I don’t know where the author gets these screenshots.
Hi Muhammad, AWS is always changing their AWS Console UI, and recent updates have changed the look of the console. The steps and settings, however, are almost identical to what I’ve laid out in my guide. Feel free to ask any specific questions!
Thanks so much!
You’re welcome! Glad it was helpful!
Thanks – this has been a huge help being new to AWS. Is it possible to further run “`npm run prod“` on AWS by installing node on the PHP instance? Using “`eb deploy“` takes into account gitignore, making the package to upload to S3 much smaller (quicker to upload and cheaper) but currently I have a “`.ebignore“` which only includes the env, tests and vendor files. I would love to get rid of this
Hi Chris, you can definitely run any number of build steps during the deploy process. Just add a new .config file with those commands. For instance, on production I tend to also install ClamAV and set up custom SSH users and keys using the config files.
Anyone else having a similar problem with me, where supervisor started the artisan process (artisan runs when you check `ps aux` but it doesn’t pick up any jobs from the database?
Hi Eric, I haven’t run into this issue in the past. Were you able to figure out the issue?
Hi! Thanks for publishing this article it’s very informative! I just have one question about the scheduler cron job: what prevents multiple instances from each running the schedule:run command?
Thanks!
That’s a great point! When running cron jobs in a distributed environment, one of the best recommendations I’ve found is to have a locking mechanism of some sort or a record of actions that each machine checks against. This ensures only 1 machine runs the job. For example, in a system that needs to send a notification out to users at 10am, you probably want all your instances working through the notification list to speed up the process. In a case like this, I’d have a notification history table, and, before sending a notification to a user, the system checks to see if the user already received one for that time period. If so, move on to the next user in the notification list. It does add some complexity, but it’ll speed up sending out notifications by distributing the work over multiple instances.
Another option is to designate one machine as a “master”, and it’s the only machine that can run cron jobs. That introduces a single point of failure, which is the big reason people move to something like Elastic Beanstalk.
A last option is to have a separate instance whose job is to just run cron jobs, though again that introduces a single point of failure.
I also found this SO answer from AWS support which references a few other solutions: https://stackoverflow.com/questions/10061843/how-to-convert-linux-cron-jobs-to-the-amazon-way.
Let me know if that helps!
Hi! Thanks for this amazing tutorial. I have 3 differents environments. So I need a different .env for each EB instance. Any suggestion about how to handle this issue, because 02env_vars.config is only considering one environment?
Thanks!
Liuver
Hi, instead of using the .env copy from S3 then mv approach used here for environment variables I just set them up in the server settings for the environment and have them pass through to Laravel that way. Works with both RDS as part of Environment stack (bad idea) and with a separate RDS instance. This way you can do away with .env and have as many environments as you want, just set up the attributes.
Hope this helps someone else!
p.s. Paul, thanks for the excellent tutorial post!
Hi Andy! Glad you’ve found the post helpful. Specifying the environment variables in the EB configuration settings is one option if you set up the environment via the AWS Console. If you set up environments via the command line using cloud formation templates, then I found that pulling in a .env file was easiest. I do need to experiment with CodePipeline, which could also take care of environment configuration.
My usual setup is to have 3 main branches: sandbox, staging, and production. Each branch has slightly different ebextension files depending on the environment. My recommendation would be to have 02env_vars.config on each branch pointing to a different .env file on S3.
Hello Paul,
Thanks for the guide is almost exactly what i was looking for, i am looking for a guide using laravel-codeCommit-Pipeline-Beanstalk for a fully automatic deployment solution.
Neither way this guide helps me a lot, however, please one question, on config file 03artisan.config, section 14_permissions:, you setup permissions to 777 on all laravel app ?, i normally only set group permissions to storage and cache folders and add web server group to those folders.
Is there any particular reason to add 777 to all laravel folder ?, which i believe is not recommended
Hope to see your reply soon
Thanks !!!
dracul
Hi Dracul, we experimented with several permissions because we had issues with permission errors when running the cron job for the scheduler, and in the end 777 for the laravel folder was recommended by AWS. I haven’t tested this with the latest Laravel version and latest PHP stack on EB. I’ll have to experiment again.
Won’t that open up everything in your app to all users? This seems concerning to me, but I could be wrong.