Hot on the heels of my Laravel on AWS Elastic Beanstalk Dev Guide (i.e., 2.5 years later), I’m happy to publish my Laravel 5 on AWS Elastic Beanstalk Production Guide! So let’s dive right into it.

Background

There have been a lot of changes with Laravel and with Elastic Beanstalk since my Dev Guide in 2014. This guide steps you through the process of deploying a Laravel 5 app to AWS Elastic Beanstalk.

I presented this deployment flow during the February LaravelSF Meetup event at the AWS Loft in San Francisco. During my presentation I used my demo app, LaraSqrrl, to show the process, along with integration with S3 and SQS (upcoming posts).

Prerequisites

As in my previous guide, there are some prerequisites before you jump into the guide:

  • You should have an AWS account.
  • You have git installed and a git repo initiated for your project.
  • You should familiarize yourself with Elastic Beanstalk.

RDS Database

I like to keep my RDS instance separated from Elastic Beanstalk, as RDS instances created by and associated with an Elastic Beanstalk environment will be terminated when the environment is terminated. Separating the RDS instance from the environment allows you to keep the same database regardless of the environment.

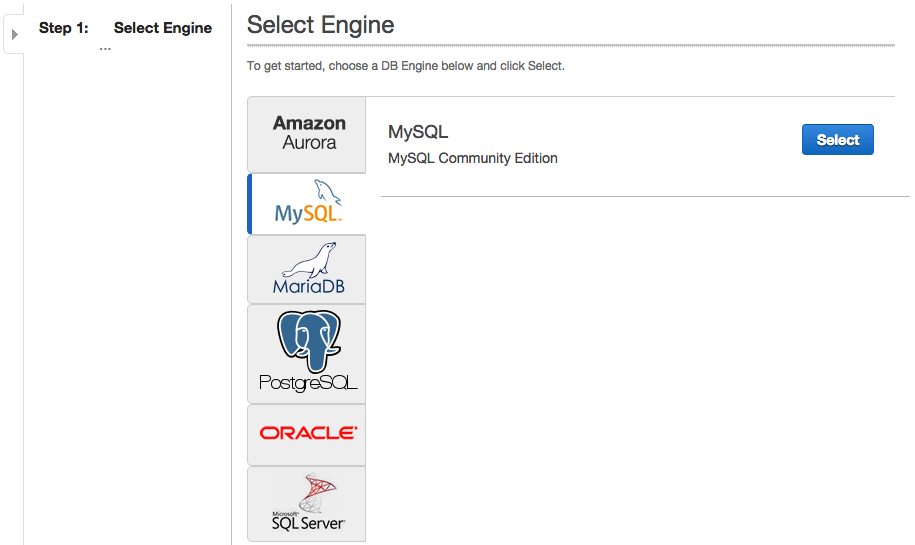
Step 1: Choose your engine

Choose whichever database engine your app is set up for. I generally use MySQL with Laravel, so that’s what I’ll select.
rds_mysqlContinue reading

Hey there! I know it’s been a while since I’ve posted. Since my last post, the team and I decided to shut down SimpliFit, and I’m at Infuse.us! Though I’m sad that SimpliFit did not work out, I’m excited about the next stage in my career at Infuse.

I’m also happy to say that in September I became the main organizer for the LaravelSF Meetup. Lot’s of exciting stuff coming up, and I’ll have a new post this week for deploying Laravel 5 to Elastic Beanstalk.

On to bigger and better things!
Paul

P.S. You may have noticed that the blog sidebar is a bit outdate. That’s definitely on my to-do list, so expect a site refresh within the next few weeks (realistically months)!

Whoah! It’s been awhile since my last post. In that time SimpliFit launched the SimpliFit Weight Loss Coach for Android and iOS, the SimpliFit Coaching program, and, just last week, Magical, a texting-based picture calorie tracker. Yes, we’ve been quite busy! And it’s given me a lot more content for future blog posts.

Today, though, I’ll build on my previous post, Validating iOS In-App Purchases With Laravel, by covering Android in-app purchases (IAPs) in Laravel. The process was completed for a Laravel 4 app, but the code I’ll be showing can be used in Laravel 5 as well.

The workflows between iOS and Android are fairly similar, and just as working with iOS IAPs was frustrating due to lackluster documentation, working with Android IAPs is just as frustrating. If Apple and Google would take the best parts of each of their IAP systems, you would get quite a good system. As it stands, though, both systems make you wish your app didn’t have IAPs.

But if you’re reading this, then you probably have the unenviable task of adding IAP verification to your app.  First, I’d recommend you get familiarized with Google’s In-app Billing documentation and skim the Google Play Developer API. Also, I’m assuming that you’ve already created your app in your Google Play Developer Console and added the in-app products you’ll be offering.

On the front-end, we are again using the Cordova Purchase Plugin to mediate between our app and Google Play via Google’s In-App Billing Service. Since the SimpliFit app only had a monthly subscription (we since made the app free), I’ll be discussing how to work with in-app auto-renewing subscriptions, however this guide can easily be applied to a one-time IAP.

Android IAP Workflow

Just as with iOS, we have three IAP stages: 1) Retrieve product information, 2) Request payment, and 3) Deliver the product.

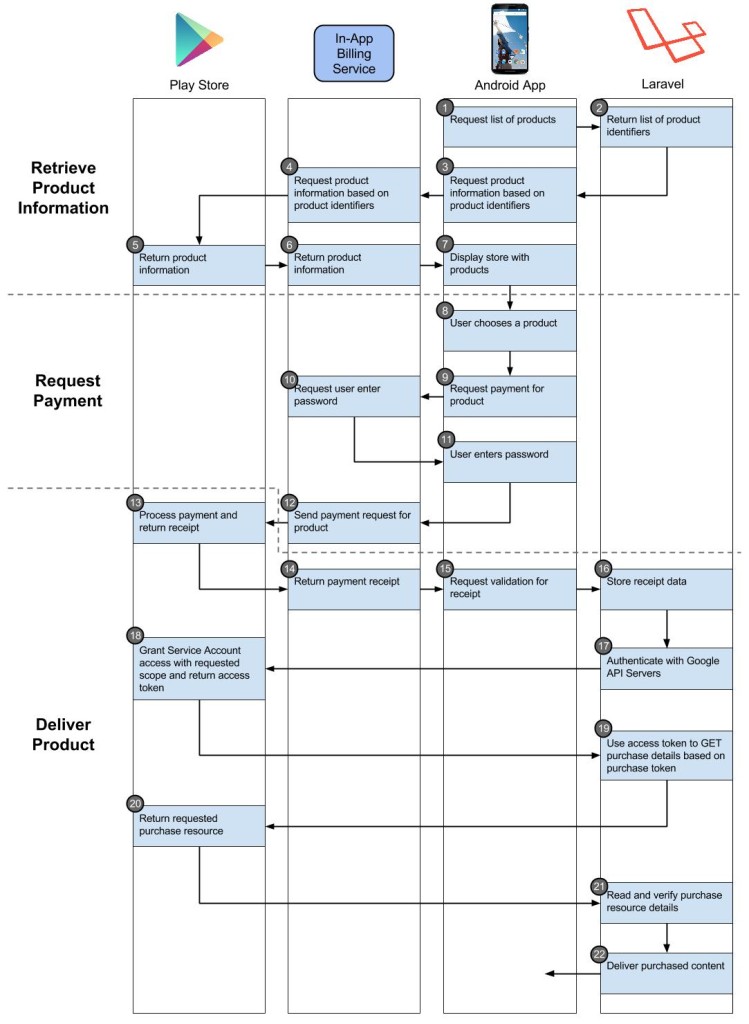
Stage 3 was the most involved for Laravel for iOS IAPs, and for Android the steps increase. Take a look:

Android In-App Purchase FlowContinue reading

Validating iOS In-App Purchases With Laravel

Let’s say you have an iOS app (like SimpliFit), you’re using Laravel (or any PHP framework) for your API, and you want to validate an iOS in-app purchase (IAP) with Apple’s servers. Where to begin? Well, you might think about checking Apple’s documentation on Validating Receipts With The App Store. But that won’t help, at least not much.

To say that Apple’s documentation around IAPs is lacking is an understatement. So I turned to Google and found numerous StackOverflow posts, Github repos and gists, and blog posts concerning validating IAPs, specifically with PHP. Unfortunately, many were several years old and no longer accurate, leaving me confused and with a puzzle with many missing pieces. But I’ve finally solved it. And to help everyone else going through this agony, here’s what I’ve learned.

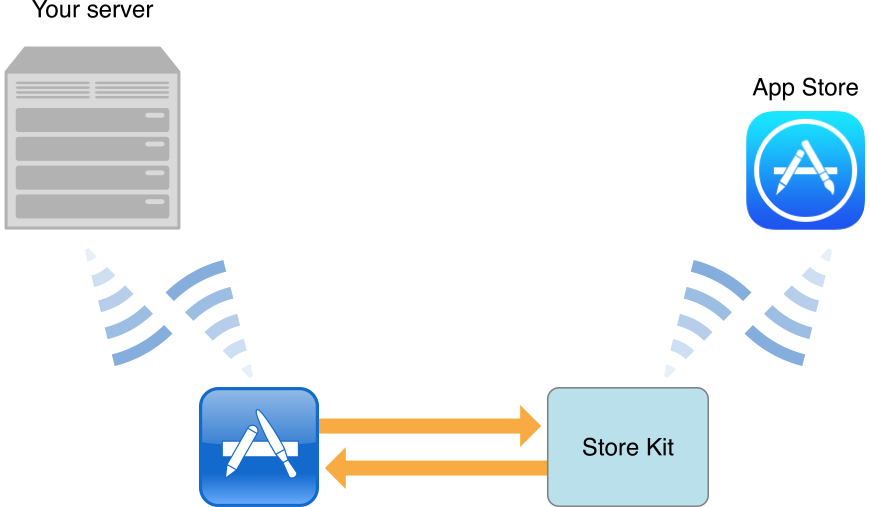
But first, a quick review of our setup. On the front-end, SimpliFit’s iOS app is built using AngularJS and Cordova, with purchases being handled via the Cordova Purchase Plugin. The Cordova Purchase Plugin takes care of communicating with Apple’s Store Kit framework (which in turn communicates with Apple’s App Store, see image below). And on the back-end, our API is built with Laravel on AWS.

Communication between iOS app, Store Kit, and App Store

Source: https://developer.apple.com/library/ios/documentation/NetworkingInternet/Conceptual/StoreKitGuide/Introduction.html

The IAP Process Breakdown

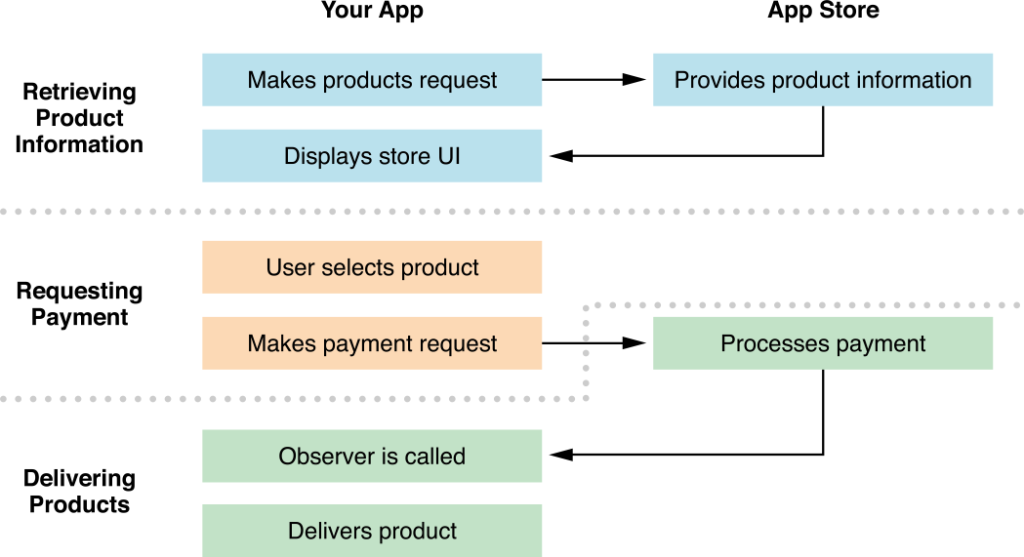
Let’s breakdown this process into 3 stages, as outlined in Apple’s documentation:

  1. First, the products that the user can purchase are retrieved and displayed.
  2. Once the user selects a product, a payment request is initiated.
  3. Upon successful payment, the product is delivered to the user

In-App Purchase Stages

Source: https://developer.apple.com/library/ios/documentation/NetworkingInternet/Conceptual/StoreKitGuide/Introduction.html


Continue reading

Laravel on AWS Elastic Beanstalk

How to use this guide

This guide will walk you through setting up a Laravel development environment on Elastic Beanstalk.

Before using Elastic Beanstalk, I was using a shared hosting account, and I got fed up with outdated packages and the lack of admin privileges. My goal with this guide was to create a dev server that closely mirrored my intended production environment in Elastic Beanstalk (another post on that coming soon). This is the exact setup I use for SimpliFit’s API dev server.

What is Elastic Beanstalk?

First, a quick overview. Amazon Web Services’ Elastic Beanstalk is a Platform as a Service (PaaS), allowing developers to deploy applications without the hassle of detailed server infrastructure, such as server provisioning or scaling to meet demand.

Elastic Beanstalk uses the following AWS products:

  • Elastic Compute Cloud (EC2)
  • Simple Storage Service (S3)
  • Simple Notification Service (SNS)
  • CloudWatch

Continue reading

As I mentioned in my first post, when I started using Laravel I knew nothing about the concept of MVC. It was difficult to transition from writing pure PHP (which I had only learned 6 months prior to working with Laravel) to an MVC framework. There a lot of great resources for MVC noobs —tut+’s MVC for Noobs is one—and introductions to Laravel—Laracast’s free Laravel From Scratch series is one, Laravel Book’s Architecture of Laravel Applications (http://laravelbook.com/laravel-architecture/) is another—but let’s quickly recap the basic concepts.

The MVC Pattern

At its core, the MVC architectural pattern exists to help with the Separation of Concerns (https://en.wikipedia.org/wiki/Separation_of_concerns) in your code.  The MVC pattern consists of:

  • Models: represent stored data and enforce “business” rules/logic on the data (in Laravel, a model is analogous to a table in your database)
  • Views: present data to the user
  • Controllers: mediate between the View and the Model

In Laravel 4, the app directory has folders for controllers, models, and views. You would expect the typical flow of information would go like this:

  1. A route is invoked
  2. The route calls a function within a controller
  3. The controller uses a model to access data
  4. The controller passes that data to a view
  5. The view displays the data to the user

And in it’s most simplest form, that’s exactly how the Laravel framework works. Looking at the files that are included in a new Laravel install (at least in Laravel 4.x, this is changing with Laravel 5.x), this made sense. And so I moved forward believing that everything must fall into a model, a view, or a controller.

My Controllers Needs A Diet

The first feature I created for the SimpliFit beta API was simple: show all the habits a user has learned since they started with SimpliFit. We called this feature Achievements. “Easy enough,” I thought as I created a few models, coded the relationships, and seeded the database. In the end, my one controller function had ballooned to over 100 lines of code while my models were at about 30. I tested the feature and it worked.
Continue reading

Getting Set Up For Laravel

There are a ton of articles about how to set up Laravel and the author’s tools of choice, and I debated whether or not the Laravel community needs another. But seeing as I’ll be writing a lot of articles about Laravel and there may be people who, like me, have never used an MVC framework or Git before, I figured I’ll just write up a quick post. First up…

Setting up Git

If you were like me when you started coding, whenever you created a new version of a file, you’d save the old file with a date or previous version number tacked onto the file name. This quickly got out of hand and managing different versions of files became a huge headache for our alpha. This is where Git can help.

Continue reading

Laravel - the PHP framework for artisans.It was February 2nd, and I was heading to a Super Bowl/birthday party. I had quit my job only a month before to work full-time on my startup, SimpliFit (then called TrackFaster) and was coding the hobbled-together backend in PHP for our third Alpha version (more on Alpha v0.3 and lessons learned from that some other time).

At the party, a mutual friend introduced me to Jonathan Stassen, and I gave him the usual pitch. He just so happened to also be working at a startup and was learning a PHP framework called Laravel.

Continue reading