
Whoah! It’s been awhile since my last post. In that time SimpliFit launched the SimpliFit Weight Loss Coach for Android and iOS, the SimpliFit Coaching program, and, just last week, Magical, a texting-based picture calorie tracker. Yes, we’ve been quite busy! And it’s given me a lot more content for future blog posts.
Today, though, I’ll build on my previous post, Validating iOS In-App Purchases With Laravel, by covering Android in-app purchases (IAPs) in Laravel. The process was completed for a Laravel 4 app, but the code I’ll be showing can be used in Laravel 5 as well.
The workflows between iOS and Android are fairly similar, and just as working with iOS IAPs was frustrating due to lackluster documentation, working with Android IAPs is just as frustrating. If Apple and Google would take the best parts of each of their IAP systems, you would get quite a good system. As it stands, though, both systems make you wish your app didn’t have IAPs.
But if you’re reading this, then you probably have the unenviable task of adding IAP verification to your app. First, I’d recommend you get familiarized with Google’s In-app Billing documentation and skim the Google Play Developer API. Also, I’m assuming that you’ve already created your app in your Google Play Developer Console and added the in-app products you’ll be offering.
On the front-end, we are again using the Cordova Purchase Plugin to mediate between our app and Google Play via Google’s In-App Billing Service. Since the SimpliFit app only had a monthly subscription (we since made the app free), I’ll be discussing how to work with in-app auto-renewing subscriptions, however this guide can easily be applied to a one-time IAP.
Android IAP Workflow
Just as with iOS, we have three IAP stages: 1) Retrieve product information, 2) Request payment, and 3) Deliver the product.
Stage 3 was the most involved for Laravel for iOS IAPs, and for Android the steps increase. Take a look:
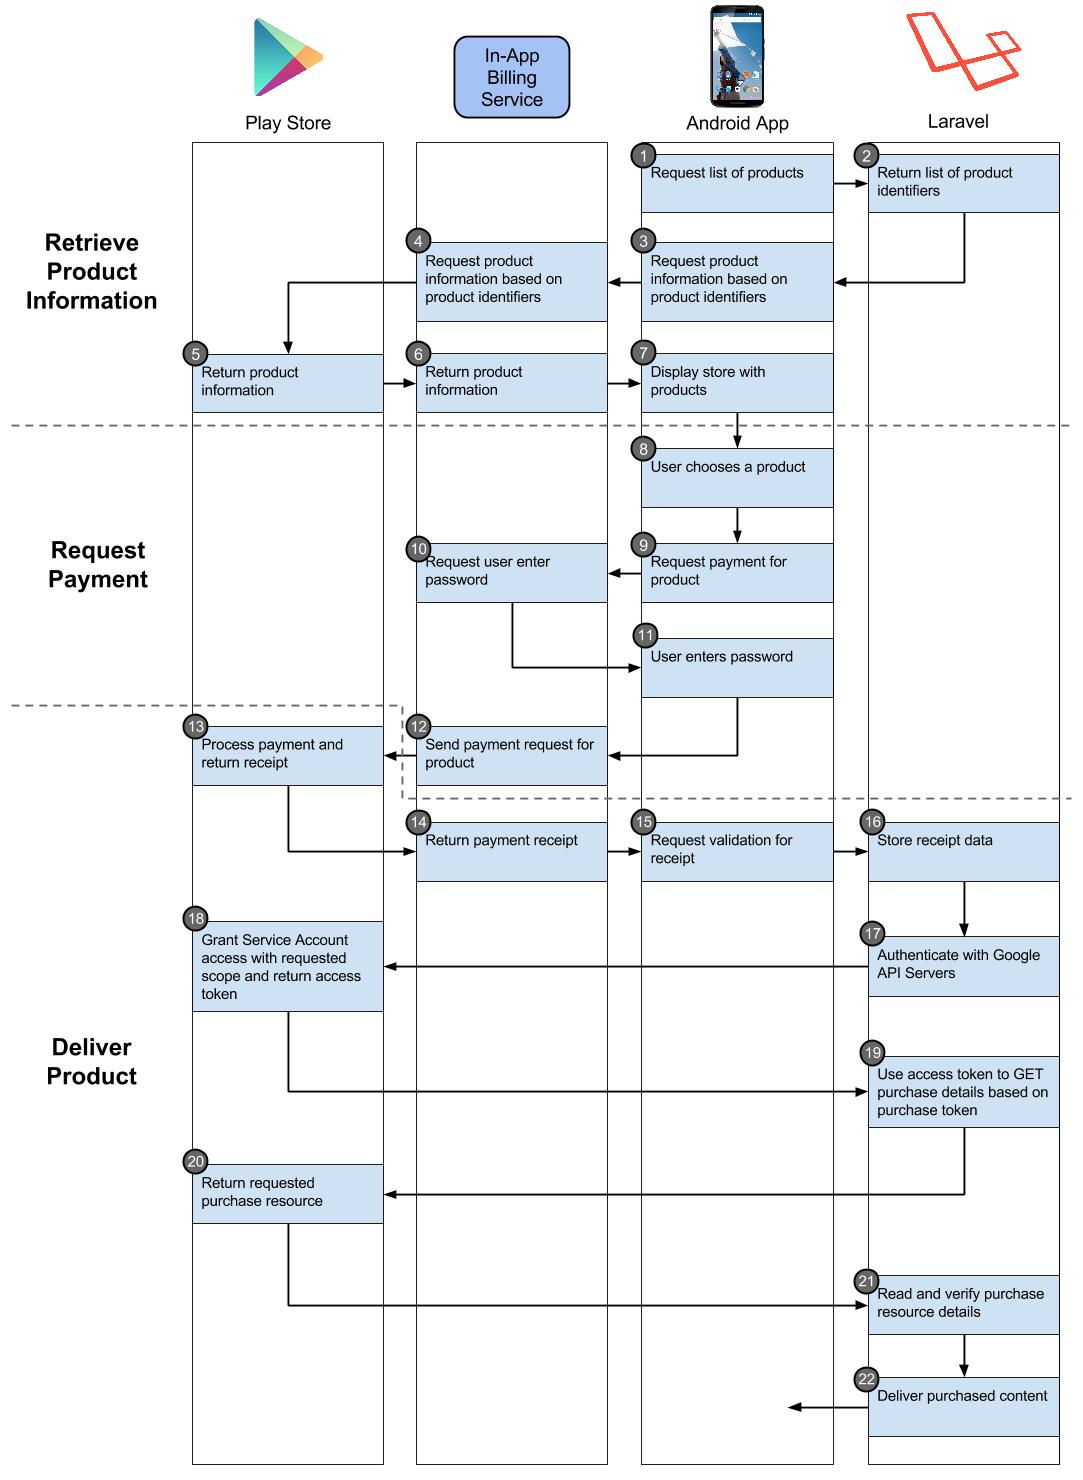
- The Android app requests the list of products from Laravel
- Laravel returns the list of product identifiers currently available for purchase
- The Android app sends these product identifiers to In-App Billing Service
- The In-App Billing Service requests product information based on product identifiers
- The Play Store returns production information (title, price, etc.)
- The In-App Billing Service returns the production information from the Play Store
- The Android app displays the products to the user
- The user selects a product to purchase
- The Android app requests payment for product
- The In-App Billing Service prepares for a purchase by requesting the user’s Google Wallet password
- The user enters his/her password
- The In-App Billing Service sends the purchase request to the Play Store
- The Play Store processes the purchase and returns a purchase receipt
- The In-App Billing Service sends the receipt to the Android app
- The Android app sends the receipt data to Laravel for validation
- Laravel records the receipt data to create an audit trail
- Laravel Authenticates itself with Google’s API servers using a Service Account
- Google authenticates the Service Account and returns an access key
- Laravel uses the access key to query the user’s purchase from the receipt’s purchase token
- The Play Store locates the purchase and returns a purchase resource
- Laravel reads the purchase resource and verifies the purchase
- Laravel unlocks the purchased content and notifies the Android app
As you can see, steps 1-16 are identical to the iOS IAP workflow. However, to communicate with Google’s API server, your server must authenticate itself first using OAuth. Thankfully, Google has a PHP library we can pull into Laravel to simplify things. We’ll get to that shortly.
NOTES:
- Steps 1 and 2 can be accomplished via hardcoding the product identifiers in the Android app, just as in the iOS IAP workflow, rather than requesting them from the server. I strongly recommend making the extra call to get the products from the server–it’s a small hit to the loading time and allows you to modify products without having to update the app.
- Steps 10 & 11 will not occur if the user made a purchase with his/her Google Wallet within the last 30 minutes.
- Just as with iOS, steps 17-22 are not necessary but are highly recommended to verify purchases. If you are working with subscriptions, in particular, this process should be required. We never had someone try to fake a subscription in iOS, but we did have attempts on Android. If we had not had receipt verification on our server, those users would have received full access to our app as if they had paid.
Retrieving Product Information and Requesting Payment
I don’t want to repeat myself, so please check my previous blog post for iOS on these two stages of the IAP process. I’m using the exact same models in Laravel as in the iOS workflow.
If you need guidance on setting up in-app products, check out Google’s documentation on Administering In-app Billing. We chose to make our product identifier for our subscription the same in Android and iOS to help us keep things more organized (i.e., com.example.app.productName).
And just as you can create test users in iOS to test your IAPs, Google allows you to grant gmail accounts test access in the Google Play Developer Console under Settings->Account details. Two things to note here, though:
- The owner of the developer account cannot purchase products from him/herself and thus cannot be a test user.
- As of November 2013, Google had no method to test in-app subscriptions, only one-time in-app purchases. This was a MAJOR blunder on Google’s part. We ended up having to make actual subscription purchases and refund them to test the full flow. But now it does seem that Google has added the ability to test subscriptions, according to their Testing In-app Billing documentation, though I have not tested this yet.
Delivering Products
On a successful purchase, the Play Store will return a receipt to the Android app, which, through the Cordova Purchase Plugin, is sent via JSON in the following format:
NOTE: This receipt structure is specific to the Cordova Purchase Plugin. If your app uses a different method to access the Google In-App Billing Service API, the receipt structure may differ. Refer to Google’s In-App Billing API for more information on receipt data.
Before we start breaking this receipt down, note that the “receipt” sub-parameter is a JSON object in string format. I suspect this is just the way the Cordova Purchase Plugin processes the Play Store receipt.
Breaking down the receipt by parameter, here’s what we have:
- The “type” specifies this is an “android-playstore” purchase (as opposed to “ios-appstore” for an iOS purchase)
- The “id” parameter is the Google Wallet Merchant Order Number.
- The “purchaseToken” uniquely identifies a purchase for a given item and user pair and is generated by Google.
- The “receipt” parameter contains a string with the JSON receipt. This contains:
- “orderId”: the same identifier as “id” above
- “packageName”: your Android app’s package name
- “productId”: the identifier of the product which the user purchased
- “purchaseTime”: the time the purchase was made in milliseconds since Epoch
- “purchaseState”: the state of the order (0 = purchased, 1 = canceled, 2 = refunded)
- “purchaseToken”: the same token as in “purchaseToken” above
- The “signature” parameter contains the signature of the purchase data signed with the developer’s private key. This can be used to verify, in the mobile app itself, that the receipt came from Google if you do not want to use the server verification method.
Great, we have a receipt! Let’s move on to storing the data to create an audit trail. Before we do, let me remind you that I use Laracast’s commander pattern in Laravel 4. As such, all the code below is from my StoreTransactionCommandHandler class and sub-classes. If I were to do the same in Laravel 5, all the logic from the handler class would simply be added to the command class itself.
Store the receipt data
Now that we have both iOS and Android IAPs available to users, and since the purchase receipt handling is different for the two platforms, we need to know from which platform the incoming purchase came. Luckily, our mobile app sends a Client-Platform header with every request to our server, which indicates android or ios. So we’ll switch between our Android and iOS receipt handling logic based on that header.
For Android receipts, the data that is of most interest to us is the “receipt” sub-parameter, which is a string of JSON data. So first, let’s get that into a format we can work with, then we store it:
What I do here is grab the receipt from the command and decode the “receipt” string JSON into an associative array called $receipt. Then I store this receipt as a pending transaction.
Since my iOS guide, I’ve added a new error flow here, where I check to see if the purchaseToken parameter is present before sending it on to be saved into the database.
Note: At this point in the iOS workflow, we also set the URL endpoint to which we send receipt data for validation. For Android, however, Google does not offer a sandbox URL endpoint. If you want to test your IAPs, take a look at the Testing In-App Billing documentation.
Allow server access to the Google API
Before being able to validate a receipt with Google’s servers, we need the necessary data to authenticate with Google’s servers.
First, go to the Google Play Developer Console API Access Settings. Under “Linked Projects”, if you already have a project listed, select “Link” next to the existing project (if it isn’t already linked). If there are no existing projects, you’ll need to create a new project by clicking “Create new project”. This creates a new linked project titled “Google Play Android Developer”.
Next we need to create a service account to access the Google API. This service account is in effect a “user” that has permissions to access your Google Play Developer resources via the API. To create the service account, click the “Create Service Account” button at the bottom of the page. This will open a modal with instructions for setting up a service account. Go ahead and follow the instructions. When you’re on the step of creating the client ID, be sure to select “P12 Key” as the key type.
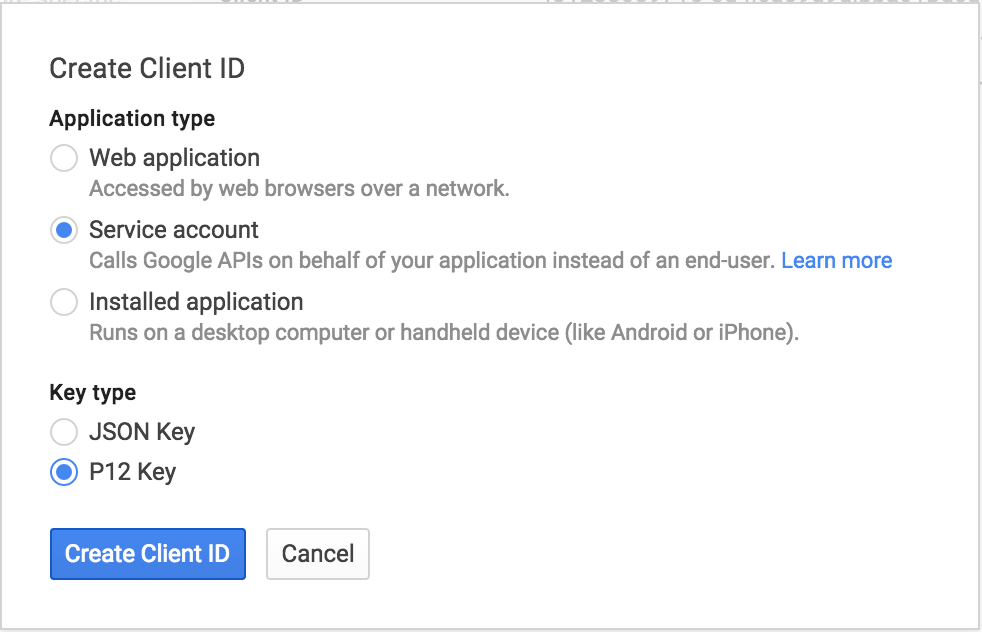
Once you click “Create Client ID” in the modal, the page will automatically download the P12 key file and will display the key file’s password. This key file will need to be accessed by your server to authenticate with Google but should not be accessible publicly. Once the modal closes, you’ll see the service account’s information. The only relevant piece we need (other than the downloaded key file) is the account’s email address.

We also need to enable the service account to use the Google Play Developer API. In the left-hand side menu, under “APIs & auth”, click “APIs” to view all the individual service APIs accessible via the Google Play Developer API.

Then under “Mobile APIs”, select “Google Play Developer API”. On the Google Play Developer API page, select “Enable API”.

Now the service account has access to the Google Play Developer API. If your server needs access to other APIs, find the appropriate APIs on the previous page and enable them.
Go back to the Google Play Developer Console and click “Done” in the open modal. The page will refresh and you should see your service account listed. Now just click “Grant Access”, and you’ll be asked to select the role and permissions for the service account. Since the server will only be getting information on existing IAPs, select only the “View financial reports” permission and click “Add User” (if you want your server to do more with the API, select the relevant permissions you’ll need).
Make the Request
Now that we have the necessary account details and permissions to access the Google API, we’re ready to make the request to Google. To help us with communicating with Google’s server, let’s pull in the Google PHP Client package to Laravel via the composer.json file:
"google/apiclient": "1.1.4"
As of this publication, the latest version of the Google PHP Client package is 1.1.4. According to the API Client Library for PHP, the Google PHP library is still in a beta state. This means that Google may introduce breaking changes into the library. The good news is that the API itself is in version 3, so that will likely remain stable for some time. For these reasons, I suggest stating the specific version of the client library you want to stick with.
With that package pulled in (after running composer update), here’s my request code with comments to guide you through it:
As you can see, the only data needed from the receipt when making the request is the purchaseToken value (no need to build a JSON object as in the iOS process). The final line (the get on purchases_subscriptions) also includes the extra authentication step noted in the Android IAP Workflow section. If that authentication step fails, a Google_Auth_Exception is thrown. I wrapped the entire code in a try/catch so that if the call results in said exception, we throw our own exception. We then handle our exception at a higher level.
The mystery of the unnecessary P12 key file password
As a quick aside, you may have noticed that we didn’t pass in the key file’s password when creating the assertion credentials. In fact, we don’t need to use that password we received with the key file at all. If you take a look into the PHP client library on GitHub at line 57 of the AssertionaCredentials.php file, which contains the Google_Auth_AssertionCredentials class, you’ll see that the __construct function’s fourth argument is the key file’s password, and the default value is “notasecret”. As of this writing, all service account P12 key file passwords are “notasecret”. If that is no longer the case when you read this article, simply add the password as a fourth argument when creating the assertion credentials.
A valid subscription response will be in the form of:
This is detailed in the Android Publisher API documentation of the Purchases.subscriptions resource.
An error response will look like:
If you’re validating a one-time product purchase receipt instead of a subscription, change the purchase_subscriptions get request to:
$product - $service->purchases_products->get($packageName, $productId, $purchaseToken);
The valid product response contents are detailed in the Purchases.products resource documentation.
Validate the response
Awesome! We have a response from Google. Let’s see if the response indicates that the receipt we received from the app was valid:
The code above is specific to validating a subscription response. And since it is a subscription, we need to check if the subscription has already expired. This compares the current UTC time to the UTC time created from the subscription response. If you’re server’s default timezone is not set to UTC, then you will need to convert the expiration time to your timezone or convert the current time in your timezone to UTC time.
Store the validated receipt and start the subscription
Almost done! Knowing we have a valid subscription receipt, we store the transaction information in our database, add an active subscription for the user to the database, and then respond OK to the mobile app’s receipt validation request to indicate the user’s purchase completed properly and was indeed valid.
Closing Notes
Validating in-app purchases for Android or iOS is a lengthy process, and, as I mentioned, the documentation isn’t always clear and laid out in a logical step-by-step manner. Hopefully this guide helps you implement the process in your own app. This should also give you a good start to implement other features, such as canceling/refunding subscriptions via the app (rather than having to do this through the Google Wallet Merchant Center).
Regarding subscriptions specifically, unlike for iOS (at least in our case), an Android subscription does have a time length (for us it was one month) and will auto-renew. There are ways to set up webhooks through the Google Play Developer API Console, and perhaps you can set one specifically for listening if a user’s subscription doesn’t auto-renew or a user cancels it via the Play store. I found that the simpler solution was to just check with Google, at the subscription period’s expiration date and time, if the subscription is still active. You can use the same purchaseToken as in the original receipt (another reason to store that receipt) and follow the same process to make another call to the Purchases.subscriptions API resource. If the subscription was successfully renewed, then the expiration time in the response will again be in the future, meaning the user has been successfully charged for another subscription term. When this happens, the order number is slightly altered after each successful subscription renewal after the initial purchase:
12999556515565155651.5565135565155651 (base order number)
12999556515565155651.5565135565155651..0 (first recurrence orderID)
12999556515565155651.5565135565155651..1 (second recurrence orderID)
12999556515565155651.5565135565155651..2 (third recurrence orderID)
This is detailed on the In-app Subscriptions page in the Subscription Order Numbers section. I keep track of the number of renewals via a counter column in my subscriptions table. And if I ever would have a need to get a specific recurrence of a subscription, I could construct that recurrence’s orderID from the renewal counter and the original order ID.
And a note on using the Google Play Developer Android Publisher API: Google lays out some best practices for using the API efficiently:
- If you’re publishing apps via the API, limit publish calls to one per day,
- Only query purchase status at the time of a new purchase,
- Store purchase data on your server, and
- Only query subscription status at the time of renewal.
These are good practices to follow, as your developer account does have a request quota per day (200,000 API requests per day “as a courtesy”). Also, this helps decrease the number of HTTP requests between your server and Google, speeding up server responses to your mobile app.
And one more thing…
On Twitter, @dror3go asked about dealing with restoring a purchase if a user gets a new phone:
@pauly4it btw, how do you overcome the issue of users who made in-app purchase and then replace the phone?
— Dror T (@dror3go) May 29, 2015
It’s an interesting question, and there are three ways I can think of to deal with this:
- Have your server control all in-app features, including anything unlocked via purchases. For our app, whenever the user opened the mobile app, the app validated an encrypted API token in the app’s local storage with the Laravel server. During that validation, the server would also check if the associated user’s subscription was still active. If not, the server would return a specific error, and the app would throw up a blocking modal requiring the user to purchase or renew their subscription. Otherwise the server would respond with a 200 status code and the user continues to use the mobile app without any restrictions. The downside of this strategy is that this check will happen every time the user opens the app (unless the app was still active in the background), but this also means that if the user moves to a new phone or even switches to a different phone OS, the app will still work and all of the user’s purchases come with the user.
- As in #1, store the in-app features on the server, but also store that information in local storage on the phone. With this strategy, you will need to encrypt the data, so that someone cannot tamper with the data and give themselves a paid feature. If a user switches phones, the server will need to recognize that situation and instruct the app to enable the features for which the user paid. The disadvantage here is that now the mobile app itself may need logic to determine if a subscription is still active, but the server now has less processing to do.
- And finally, the last strategy is to have the mobile app control all in-app purchase product restoration. No (or limited) purchase data is stored and processed on the server. Instead, the app stores purchase data in local storage. And if the user switches phones, the app will have to have a way to restore these purchases. It would do this by checking if there is anything saved in local storage, and if not, it would have to do a call to the Google Play Store to see if the user has purchased any of the products for the app. In theory this is possible, though I have not investigated this strategy myself.
My vote is for strategy #1. This offloads as much logic from the client onto the server. Theoretically, this means the client app will run faster, and if the server begins to use more resources, we can easily scale using AWS.
Google_Auth_AssertionCredentials is deprecated in the Google PHP Client v2
https://github.com/google/google-api-php-client/blob/master/UPGRADING.md
Hello. Thanks for tutorial!
One still open question:
Do Google Play Market send any callback to client after every successful charge with appropriate order id and other billing details?
No i doesn’t
Hi, does the recurrent subscription really have dots in the orderId? How can I detect a subscription renewal, can I do a regex and search for the two dots (..) in the orderId ? Thanks.
Thanks for the detailed post. I do want to check if you considered using a nonce for the developer payload that is mentioned here http://developer.android.com/google/play/billing/billing_best_practices.html#payload.
I didn’t see you mention it in this article. I understand that you can do verification of subscription purchases with the purchase token alone without the nonce payload. Is there a reason you didn’t include it in your blog post?
Hey,
thanks for this nice tutorial. Is there a sample project where I can see the result?
regards